
Table of Contents
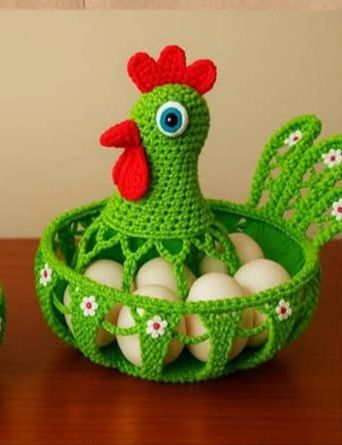
Creating a crochet rooster egg holder is one of the most rewarding farmhouse kitchen crafts you can master. This charming green rooster design combines practical egg storage with delightful country kitchen aesthetics, making it perfect for both everyday use and special occasions.
Materials for Crochet Rooster Egg Holder
To create this stunning crochet rooster egg holder, you’ll need high-quality materials that ensure durability and visual appeal. The right yarn selection is crucial for achieving the professional finish shown in our example.
Yarn Requirements
- Main color: Bright green worsted weight cotton yarn (approximately 150g)
- Accent colors: Red yarn for comb and wattle (25g)
- Detail work: White and pink yarn for flowers (20g each)
- Eye detail: Blue embroidery floss or small blue bead
Why Cotton Yarn Works Best
Cotton yarn is ideal for your crochet rooster egg holder because it’s washable, durable, and maintains its shape over time. This is particularly important for functional kitchen items that may need regular cleaning.
Essential Tools and Supplies
Professional results require the right tools. Here’s everything you need for your crochet rooster egg holder project:
- Crochet hook size 4.5mm (G/7 US)
- Yarn needle for sewing pieces together
- Stitch markers for tracking rounds
- Scissors for cutting yarn
- Measuring tape
- Safety pin for marking starting points
- Fiberfill stuffing for the head
Step 1: Creating the Base Ring
The foundation of your crochet rooster egg holder starts with a magic ring technique. This creates a tight, professional center without any visible holes.
Magic Ring Instructions
Begin with a slip knot, then create a loop with your yarn. Insert your hook through the loop and pull up a working loop. Chain 3 (counts as first double crochet), then work 11 more double crochet stitches into the ring.
Pull the tail to close the ring tightly. This technique, popularized by Japanese amigurumi artists, ensures a perfect start for your project.
First Round Completion
Join with a slip stitch to the top of the beginning chain-3. You should have 12 double crochet stitches total. This forms the foundation for your egg holder base.
Step 2: Building the Egg Holder Bowl
The bowl section of your crochet rooster egg holder requires careful increases to create the perfect curve for holding eggs securely.
Increasing Rounds Pattern
- Round 2: Chain 3, dc in same stitch, 2 dc in each stitch around (24 stitches)
- Round 3: Chain 3, dc in next stitch, 2 dc in next stitch, dc in next stitch repeat around (36 stitches)
- Round 4: Continue pattern, increasing every third stitch (48 stitches)
Creating the Bowl Shape
After reaching your desired diameter (approximately 6-7 inches), work several rounds without increases to create the depth needed for egg storage. The crochet rooster egg holder should be deep enough to securely cradle standard chicken eggs.
Side Wall Construction
Work 8-10 rounds of single crochet without increases. This creates the vertical walls that will hold your eggs in place. Maintain even tension throughout to ensure uniform appearance.
Step 3: Crafting the Rooster Head
The rooster head is the focal point of your crochet rooster egg holder. This section requires attention to detail and proper proportioning.
Head Shape Foundation
Start with a new magic ring and work in spiral rounds:
- Round 1: 6 sc in magic ring
- Round 2: 2 sc in each stitch (12 stitches)
- Round 3: sc, 2 sc in next stitch repeat (18 stitches)
Continue increasing until you reach approximately 3 inches in diameter, then work straight rounds to create an oval head shape.
Neck Construction
The neck connects the head to the bowl. Create a tubular section using single crochet worked in continuous rounds. This should be approximately 2 inches long and wide enough to attach securely to both head and bowl.
Step 4: Making the Rooster Comb and Wattle
The distinctive red comb and wattle give your crochet rooster egg holder its authentic rooster appearance.
Comb Creation
Using red yarn, create individual comb sections:
- Chain 8, turn
- Single crochet back along chain
- Create 3-4 individual “flames” for the comb
- Vary heights for natural appearance
Wattle Construction
The wattle hangs beneath the beak area:
- Create small teardrop shapes using single crochet
- Attach securely under the head section
- Position for realistic placement
Step 5: Adding Decorative Flower Details
The charming small flowers around the bowl rim elevate your crochet rooster egg holder from simple to spectacular.
Flower Pattern
Each small flower requires:
- Magic ring with 5 single crochet
- Chain 3, slip stitch in ring for each petal
- Work 5 petals total
- Add tiny yellow center with French knot
Placement Strategy
Space flowers evenly around the bowl rim. The example shows approximately 8-10 flowers, creating a beautiful decorative border that complements the overall design.
Step 6: Assembly and Attachment
Proper assembly ensures your crochet rooster egg holder maintains its structural integrity and attractive appearance.
Attachment Order
- Stuff the head lightly with fiberfill
- Attach neck to back rim of bowl
- Sew head to top of neck
- Attach comb to top of head
- Add wattle under head
- Sew flowers around bowl rim
Sewing Techniques
Use mattress stitch for invisible seams. This professional finishing technique, commonly used in advanced crochet construction, creates strong, nearly invisible joins.
Step 7: Final Finishing Touches
The finishing details transform your crochet rooster egg holder from good to exceptional.
Eye Placement
Position the eye approximately 1/3 down from the top of the head and slightly forward. Use a blue bead or embroider with blue floss for the most realistic appearance.
Quality Check
Inspect your finished crochet rooster egg holder for:
- Secure attachments at all join points
- Even tension throughout all sections
- Proper egg-holding capacity
- Aesthetic balance and proportion
Final Blocking
Lightly steam or wet block your finished piece to set the stitches and create professional appearance. This step is crucial for achieving the polished look shown in professional patterns.
Pro Tips for Perfect Results
Achieving professional results with your crochet rooster egg holder requires attention to these crucial details:
Tension Consistency
Maintain even tension throughout your work. Inconsistent tension creates an uneven appearance and can affect the structural integrity of your egg holder.
Color Selection
Choose colors that complement your kitchen decor. While the traditional green and red combination is classic, consider adapting colors to match your personal style.
Size Adjustments
Modify the pattern for different egg sizes:
- Smaller version for quail eggs
- Standard size for chicken eggs
- Larger version for duck or goose eggs
Maintenance and Care Instructions
Your handmade crochet rooster egg holder requires proper care to maintain its beauty and functionality:
Cleaning Protocol
- Hand wash in lukewarm water with mild detergent
- Gently squeeze out excess water (never wring)
- Lay flat to dry on clean towels
- Reshape while damp if necessary
Storage Recommendations
Store your crochet rooster egg holder in a dry location away from direct sunlight to prevent fading. Consider wrapping in tissue paper during long-term storage.
Troubleshooting Common Issues
Even experienced crafters encounter challenges when creating a crochet rooster egg holder. Here are solutions to common problems:
Uneven Bowl Shape
If your bowl appears lopsided, check your increase pattern. Consistent increases every round create perfect circles.
Loose Attachments
Reinforce all attachment points with additional stitching. Functional items like your crochet rooster egg holder need extra security.
Tension Problems
Practice maintaining consistent yarn tension through practice swatches before starting your main project.
Customization Ideas
Make your crochet rooster egg holder unique with these creative variations:
Seasonal Adaptations
- Spring: Add pastel flowers and Easter colors
- Summer: Use bright, vibrant color combinations
- Fall: Incorporate autumn leaves and warm colors
- Winter: Add snowflakes and cool color palettes
Size Variations
Create a family of egg holders in different sizes for various occasions and egg types.
Advanced Techniques for Experienced Crafters
For those ready to challenge themselves further with their crochet rooster egg holder, consider these advanced techniques:
Textured Stitches
Experiment with different stitch patterns for added visual interest:
- Bobble stitches for texture
- Shell stitches for decorative edges
- Post stitches for raised details
Color Work
Advanced crafters can incorporate Fair Isle or intarsia techniques for complex color patterns within the basic structure.
Conclusion
Creating a crochet rooster egg holder combines practical functionality with artistic expression, resulting in a charming piece that enhances any kitchen space. This project demonstrates how traditional crafts can create both beautiful and useful household items.
The techniques learned while making this crochet rooster egg holder can be applied to numerous other projects, expanding your crochet repertoire significantly. From basic construction to advanced finishing techniques, each step builds valuable skills.
Whether you’re creating this piece for your own kitchen or as a thoughtful handmade gift, the crochet rooster egg holder represents the timeless appeal of functional folk art. The satisfaction of creating something both beautiful and useful makes this project particularly rewarding.
For additional patterns and advanced techniques, explore resources like Crochet Pattern Central and Ravelry’s extensive pattern database. These platforms offer thousands of patterns and connect you with a global community of crochet enthusiasts.
Remember that mastery comes through practice. Don’t be discouraged if your first crochet rooster egg holder doesn’t match the example perfectly. Each handmade piece carries its own unique character and charm, making it special in its own way.
The time invested in creating this delightful crochet rooster egg holder will reward you with years of functional use and countless compliments from visitors who admire your handcrafted kitchen décor.

